User Tools

Site Tools


Sidebar

Over de Maakplek

Nieuwe Deelnemers

Deelnemer worden
FAQ voor nieuwe deelnemers


Stichting Maakplek
Struisvogelstraat 15
9713 BT Groningen
Kaart

welkom@maakplek.nl
KVK nr: 62152483

maakplek_statusmelder

Maakplek statusmelder

Schakelaar box met ESP8266

Gemaakt door Jasper

De ESP8266 maakt verbinding met wifi en stuurt bij het omhalen van de schakelaar een bericht naar de twitter API van pushingbox. Zijn 3.3v voeding krijgt hij via een spanningsregelaar die is aangesloten op de vcc uitgang van de pro micro.
De esp8266 heeft twee boot modes : met de schakelaar op “dicht” start de esp8266 in update mode en is de code te veranderen, dit is te zien door een zwak brandende LED boven de schakelaar.
Met de schakelaar op “open” start hij normaal op en zal hij normaal functioneren, dit kun je zien doordat de LED eerst uit gaat en zodra er verbinding is met Wifi zal de led fel branden.

code voor de esp8266:

#include <ESP8266WiFi.h>

#define AP_SSID     "Maakplek"
#define AP_PASSWORD "ik........nl"

#define API_SERVER  "api.pushingbox.com"
#define API_KEY     "bekendbijJasper"

#define ledPin 0
#define switchPin 2

int switchState = false;
int lastSwitchState = false;
int lastConnected = false;

void setup() {
  Serial.begin(115200);
  pinMode(switchPin, INPUT_PULLUP);
  pinMode(ledPin, OUTPUT);
  wifiConnect();
}

void loop() {
  switchState = digitalRead(switchPin);
  if (switchState != lastSwitchState) {
    if (switchState == HIGH) {
      WiFiClient client;
      if (!client.connect(API_SERVER, 80))
      {
        Serial.println("connection failed");
        return;
      }
      client.print("GET /pushingbox?devid=");
      client.print(API_KEY);
      client.print("&state=open");
      client.println(" HTTP/1.1");
      client.print("Host: ");
      client.println(API_SERVER);
      client.println();

      digitalWrite(ledPin, HIGH);

      Serial.println("open");

      delay(10);
    }
    else {
      WiFiClient client;
      if (!client.connect(API_SERVER, 80))
      {
        Serial.println("connection failed");
        return;
      }
      client.print("GET /pushingbox?devid=");
      client.print(API_KEY);
      client.print("&state=gesloten");
      client.println(" HTTP/1.1");
      client.print("Host: ");
      client.println(API_SERVER);
      client.println();

      digitalWrite(ledPin, LOW);

      Serial.println("gesloten");

      delay(10);
    }

  }

  lastSwitchState = switchState;

}
void wifiConnect()
{
  Serial.print( "Connecting to " );
  Serial.print( AP_SSID );
  WiFi.begin( AP_SSID, AP_PASSWORD );
  while ( WiFi.status() != WL_CONNECTED )
  {
    delay( 1000 );
    Serial.print( "." );
  }

  Serial.println( "" );
  Serial.println( "WiFi connected" );

  Serial.println( WiFi.localIP( ) );
}

Telefoonbox met Arduino pro micro

uitbreiding gemaakt door Wouter R

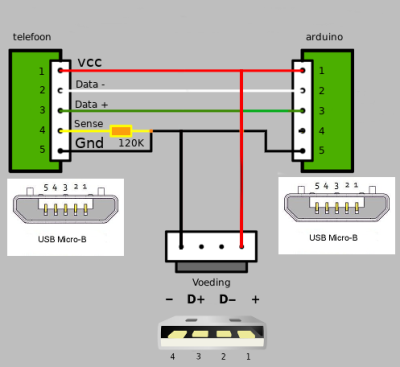
De arduino pro micro is via USB-OTG verbonden met een lader en de telefoon zodat de telefoon oplaad en via muis/keyboard te besturen is. De pro micro is net zoals de leonardo door zijn ATmega32U4 processor direct via USB te gebruiken en kan dus ook via USB een HID apparaat nadoen.
Via deze methode wordt via keyboard commando's een bericht naar whatsapp gestuurd. De telefoon verbonden via WiFi en is voorzien van een prepay simkaartje ZONDER internet (5 euro voor 7,50 beltegoed, minimaal 1x per kwartaal een telefoontje of sms, 10 ct per sms) en stuurt via een app elke maand een sms om het nummer en beltegoed te behouden.
Onderop het kastje zit een schakelaar achter de draad waarmee de arduino zorgt dat hij niets via de HID interface typt.
Dit is vooral handig voor tijdens het opstarten van de hele combinatie of tijdens het schrijven van de code in de arduino (anders begint hij vrolijk in je arduino editor te typen).

Code voor de Arduino Pro Mini:

#include "Keyboard.h"

#define buttonPin 3    // the number of the pushbutton pin
#define enablePin 4    // the number of the enable switch

int buttonState = LOW;       // the current reading from the input pin
int lastButtonState = LOW;   // the previous reading from the input pin
int maakplekState = LOW;     // the previous state 

void setup() {
  pinMode(buttonPin, INPUT);
  pinMode(enablePin, INPUT_PULLUP);
  
Serial.begin(9600);
Serial.println("start");
Keyboard.begin();
}


void sendOpen(){   // whoooooh... old phone, don't go too fast!
    Keyboard.press (KEY_ESC); Keyboard.releaseAll(); delay(1000);   
    Keyboard.press (KEY_ESC); Keyboard.releaseAll(); delay(1000);       
    
    Keyboard.press (KEY_LEFT_SHIFT); Keyboard.print("whatsapp");Keyboard.releaseAll(); delay(1000);
    Keyboard.press (KEY_RETURN); Keyboard.releaseAll(); delay(5000); 
      
    Keyboard.print("maakplek"); delay(2000);
    Keyboard.press (KEY_DOWN_ARROW); Keyboard.releaseAll(); delay(1000);   
    Keyboard.press (KEY_DOWN_ARROW); Keyboard.releaseAll(); delay(1000);   
    Keyboard.press (KEY_RETURN); Keyboard.releaseAll(); delay(5000);   
   
    Keyboard.print("Maakplek is geopend!");delay(1000);
    Keyboard.press (KEY_RIGHT_ARROW); Keyboard.releaseAll(); delay(1000);   
    Keyboard.press (KEY_RIGHT_ARROW); Keyboard.releaseAll(); delay(1000);   
    Keyboard.press (KEY_RETURN); Keyboard.releaseAll(); delay(5000);   
    Keyboard.press (KEY_ESC); Keyboard.releaseAll(); delay(1000);       
    Keyboard.press (KEY_ESC); Keyboard.releaseAll(); delay(1000);       
    Keyboard.press (KEY_ESC); Keyboard.releaseAll(); delay(1000);       
 }

void sendClosed(){
    Keyboard.press (KEY_ESC); Keyboard.releaseAll(); delay(1000);   
    Keyboard.press (KEY_ESC); Keyboard.releaseAll(); delay(1000);       
    
    Keyboard.press (KEY_LEFT_SHIFT); Keyboard.print("whatsapp");Keyboard.releaseAll(); delay(1000);
    Keyboard.press (KEY_RETURN); Keyboard.releaseAll(); delay(5000); 
      
    Keyboard.print("maakplek"); delay(2000);
    Keyboard.press (KEY_DOWN_ARROW); Keyboard.releaseAll(); delay(1000);   
    Keyboard.press (KEY_DOWN_ARROW); Keyboard.releaseAll(); delay(1000);   
    Keyboard.press (KEY_RETURN); Keyboard.releaseAll(); delay(5000);   
   
    Keyboard.print("Maakplek is gesloten!");delay(1000);
    Keyboard.press (KEY_RIGHT_ARROW); Keyboard.releaseAll(); delay(1000);   
    Keyboard.press (KEY_RIGHT_ARROW); Keyboard.releaseAll(); delay(1000);   
    Keyboard.press (KEY_RETURN); Keyboard.releaseAll(); delay(5000);   
    Keyboard.press (KEY_ESC); Keyboard.releaseAll(); delay(1000);       
    Keyboard.press (KEY_ESC); Keyboard.releaseAll(); delay(1000);       
    Keyboard.press (KEY_ESC); Keyboard.releaseAll(); delay(1000);       
 }


void loop() {
    int enableState = digitalRead(enablePin);
    if (enableState == 0) {
      Serial.println("enabled");
      int buttonState = digitalRead(buttonPin);
      if (buttonState == 1){
        if (maakplekState != buttonState){
        Serial.println("Maakplek Open");
        sendOpen();  
        maakplekState = HIGH;  
        }
      }
      else
      {
        if (maakplekState != buttonState){
        Serial.println("Maakplek Dicht");
        sendClosed();  
        maakplekState = LOW;  
        }
      }
    }
    else {
    Serial.println("disabled");
    }  
}
maakplek_statusmelder.txt · Last modified: 2019/03/19 10:14 by wrusman